Feeds:
Posts
Comments

Archive for the ‘chat’ Category

I love maps. I don’t know why, but I guess it’s part of my being a visual person. I pore over maps to get a broader understanding of where I am, where I’ve been or where I’m going.

Because I’ve never lived where my ancestors did (save my maternal grandmother, who lived with us when I was little), I am curious about their lives and where and how they lived.

Killian and Regina Bachmann Grimm were my 2nd great-grandparents on my Dad’s side. Born in Bavaria, Germany, they brought two little girls to America about 1856 and settled in Hazel Green, Grant County, Wisconsin. (I have not been able to find them on a passenger list, so I don’t know their port of entry or exactly when they arrived.)  They had several more children once they got here.

Killian appeared on only one U.S. Federal census before he died in 1869: the 1860 census. He was listed as a laborer, rather than a farmer as one might expect in this rural area. There is a box on the census for “value of real estate” and Killian’s box is blank. So as renters, determining where they lived could be a challenge. Renters don’t leave many records.

Their neighbors that year were: Peter Myers, a tailor and John Wilkinson, a miner. Neither of them had any real estate in 1860 so they were likely renters, too. But two households down the list was a John S. Williams, farmer. The value of his real estate was $2,000. Indeed, a look at an 1877 plat map shows several parcels owned by J.S. Williams:

j s williams plat map

So while I don’t expect I’ll ever know for sure where they lived while Killian was alive, I believe I can say it was somewhere near one of these parcels.

On the 1870 census, Regina Grimm was a recent widow. This time, it’s easier to determine where she was. Her nearest neighbor was Bernard Vosberg and his wife. Also in their household were Killian and Regina’s two older children. Living with Regina in a separate household were their two younger children.1877 map of Hazel Green Wisconsin with landmarks1877 plat map zoomed

On this 1877 plat map, I have highlighted Bernard Vosberg’s farm. Note the tiny black square in the lower left corner. This is where the house was at the time. I’m thinking there might have been two houses, the larger main one and a smaller one. Perhaps the smaller one wasn’t big enough for Regina and four children, which is why two of them lived in the main house. Bernard and his wife, also Regina, didn’t have children.

So now to determine the location of this farm. I was able to identify landmarks: in red is Mill Road. In yellow is a segment of Hwy 11. Not highlighted, but running through the Vosberg property is the Sinsinawa River.  In green is the property of S. Lightcap, presumed owner of the Lightcap Mill which started operation in March 1848 but no longer exists. (And notice that one of J.S. Williams’s parcels is just south of Vosberg’s.)

I won’t bore you with the process of deciphering Township and Range land descriptions but with the help of some knowledgeable people in the Wisconsin Genealogy Network group on Facebook, Vosberg’s land description was found and plotted on a current map at randymajors.com.

vosberg property mapped--zoomed--satellite

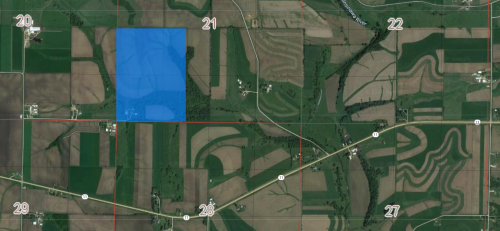
You can see Mill Road and Hwy 11 just like on the plat map. If you right click on the image and choose to open the image in a new tab (that’s in Chrome, other browsers probably have something similar) you can see that those are buildings in the lower left corner. At least one of them is a house. It doesn’t look like there is access to the property from Mill Road. But Franklin Lane, hidden by that red grid line at the bottom of the property, comes off Logan Road on the west and goes right up to the doorstep of whoever owns the property now.

in 1880 Regina was living in Jamestown, surrounded by her daughters and grandchildren, Jacob and Mary Hames on one side and Henry and Clara Gable on the other. She died in 1897 and is buried in Cuba City. There is an 1895 plat map of Jamestown. Looking at the 1900 census for Jamestown where widowed Mary Hames still lived, she stated she owned her home free and clear. She’s not on the 1895 map although I believe I’ve found her neighbor, Henry Vosberg. His property is in the upper northeast corner, labeled “Jamestown P.O.,” just north of “Louisburg P.O.” It’s probably more accurate to think Mary owned her home on a block with other homes, rather than a home on a farm.

Sources: Atlas of Grant County, Wisconsin, published by Warner and Foote, Red Wing, Minnesota, 1877. U.S., Indexed County Land Ownership Maps, 1860-1918, Online at http://www.ancestry.com (subscription required).

State of Wisconsin, Grant County, Register of Deeds. 1867 deed for 40 acres of Bernard Vosberg’s total of 120, which provided the legal land description. Online at https://www.familysearch.org/ark:/61903/3:1:3Q9M-C3Q8-92GF?i=308&cat=623450 (free).


Read Full Post »

Scanning continued

Woohoo! One box of paper files scanned and emptied, papers recycled. Only 3 boxes to go.

IMG_8218

In a lot of cases, I’m looking at source documents I haven’t seen in 20 years. The scanning process slows down because I’m checking for Findagrave memorials that didn’t exist back then, or I’m inputting the text of obituaries that I didn’t input at the time. Or, I’m finding Findagrave memorials for people I didn’t know have died recently, so I’m checking Genealogybank for their obituaries. My TMG* workflow has evolved over the years, not to mention the sourcing limitations I was under in the early years of PAF.** If I’m ever going to get my family lines output, I want my source citations cleaned up.


*The Master Genealogist

**Personal Ancestral File


robin siggy-dumb3


Read Full Post »

Filing vs. Scanning

I’ve been absent from the blog for several months because I’ve been immersed in a genealogical/clerical project of massive proportions.

I’ve been researching our families since about 1989. A genealogy hobby or vocation can really bring out your inner “hoarder” just by virtue of the fact that you have to document your sources. You’ll more than likely encounter records that you think might be your person of interest, but you can’t tell for sure. I don’t know about you, but I print out and save all that stuff, for further research.

Over the years, my collection of documentation grew. When I moved to Richmond 20 years ago, I had two file boxes. Now I have five. My filing system back then was to create a file folder for each marriage that had documentation. If the marriage produced children who didn’t live to adulthood, those documents stayed in that folder. If the children had their own marriages, they got new folders and their documents went into it. If the children reached adulthood but never married, they got their own folder. It worked well for a long time. (Obviously, I didn’t make folders until I had something to file in them.)

But this system just wasn’t sustainable. I looked at those five file boxes and I imagined them expanding to 8 or 10. Yikes! And the stack of filing I needed to do reached at least 2.5 feet. I wish I’d taken the photo when it was at its highest, but I’ve indicated about where it was and I’m not exaggerating.

DSCF1001

And on top of all this filing, I also had piles of papers and more folders sitting on the floor around this, my sewing room, of research in progress. Another unsustainable/unscalable system. I had a folder for each ancestral surname, which was better than nothing, but if you’ve done genealogical research before, you know that the number of direct ancestors increases exponentially with each generation.

In the olden days, a researcher probably relied on 5-drawer office filing cabinets. I would have easily run out of room for those. As it was, my husband shared this space with me as his office when the kids were still living at home. After they left, I quickly pushed him into one of the spare bedrooms and took over.

So I needed a solution and quick! I decided the only sane system for me was to digitize everything and recycle the paper documents. But I needed to make another decision: where to house the scans and how to find stuff later. A blogpost by Dick Eastman gave me my answer. He told about a hardware/software bundle and I bought it. It still took me a long time to decide between the Paperless software and Evernote.

I chose Evernote. I am not going to go into an in-depth review of this product, it’s been around long enough that you’ve probably at least heard of it, if not already familiar with it.

With the Fujitsu Scan Snap 1300i, I can scan directly to Evernote as a PDF document, or to Evernote or local folder on my MacBook Air as a jpeg. I use PDFs for documents, jpegs for photos. The scanner isn’t the fastest in the world, especially when I set it to convert the PDFs to searchable text. I get about 4 pages per minute that way. I also have it set for duplex scanning, meaning it will scan the front and back of the paper at the same time. If the back is blank, it discards it. That’s quite a time-saver! I also have it set to name each file with a date and time stamp. I can go back and rename them later, but not having to worry about it during scanning is also a huge time-saver!

Evernote allows you to set up notebooks to house your documents (aka notes). I have one called Inbox, which is where almost all my documents go straight from the scanner. If I have a gigantic stack of papers that would all go in the same notebook, I can set that one as the default, and the scanner targets it. Once the documents are scanned, I go through them one-by-one, tag them with the who-what-where and move them to a notebook I called Genealogy, which is just a big dump of documents that I’m finished with. I decided that rather than create tags with names, I’d use tags with the people’s ID numbers from my genealogy software, The Master Genealogist (that’s the “who”). If I want, I can rename the note with the person’s name. But with so many duplicate names in my family tree, I figured it would be hard to differentiate one from the other in a tag. But the ID numbers are unique and there’s always the searchable text! I also tag the type of document (the “what”), and the “where.” I haven’t been as good to tag the “where” as I probably should, but I can always go back and add tags later. And I decided against using date tags. I also tag each document with the surnames of the closest ancestors that I have in common with the subject of the document. For example, if the nearest closest ancestor pair that we share is my grandparents (it doesn’t matter if that pair are their grandparents too or any other generation) then I tag that document with “Hoff” and “Schmieder.” This is probably the hardest thing for me to describe, but it works for me.

The only thing about Evernote that I would put on a wishlist, is the ability to nest notebooks at least one more layer deep. I had to come up with a system for all that research-in-progress. So I created what Evernote calls a “stack” and named it Ongoing Research. Then I created a surname notebook for each of my ancestors and put those documents where they belong. It would be great if I could have one more level of notebooks in the hierarchy that I could name for specific people, just to organize the surname notebooks a little better. I suppose had I thought it out, I could have lots of surname stacks at the highest level and then put the specific person’s notebook below that. Something to think about for future.

I’ve been scanning for the last 6-9 months. I have over 6,700 notes and I should mention that I do pay for Evernote so that I have additional storage with them. All the piles of paper on the floor are gone. That pile of filing is gone. All I have left are the file folders in those 5 boxes plus another file of correspondence. I figure I should be done by Christmas.


robin siggy chalk


Read Full Post »

Wow, it’s been almost a year since I posted about my attempt at propagating hydrangeas from cuttings. You’ve surely forgotten, so here’s a reminder: Grand Experiment, garden style.

I took 12 cuttings. Over the course of the year, I nursed them in the plastic box in my Florida room. Nursing is a relative term as all I had to do was water them a little every week or two. I ended up with 6 viable plants. I had labeled them with a pencil and they are unreadable. I think most or all of them are the Nikko Blue variety, now I am going to have to wait until they bloom (fingers-crossed) to confirm. Note to self, don’t use a pencil for the labels. Try a Sharpie next time. The labels are saturated and maybe if they dry out, the wording will reappear. We’ll see.

IMG_7895

These first two came from my friend’s garden. She has several different varieties and I remember wanting to take cuttings from her white Annabelles (is that the name?) but as I recall, either I couldn’t reach them or the ground was too wet, or something. I think I ended up getting Nikko Blues from her, too.

IMG_7896IMG_7897

The remaining 4 came from my plants. I thought I had lost the little one on the right just above, but after the original leaves fell off, it sprouted again. So I went ahead and potted it up with the others, it will just have to be the runt of the litter.

So, I’m pleased that we’ve gotten this far. One of the reasons I dragged my feet about potting them up last fall after they’d taken root, was I couldn’t find instructions on the internet about what to do next. I don’t really have a place to plant them in the ground yet (and I may just give them away) and I didn’t want them to sit outside in pots over the winter. I still have that cat and there’s no way I could keep the pots inside the house.

So I’ve placed all six of these in terra cotta pots so that they won’t easily tip over and placed them in the garden next to a Nikko Blue that is planted in the ground and doing well. I figure if the conditions are right for it, they should be good for these guys, too.

So my plastic box is empty, it’s time to do it again. This time, I’ll try for those Annabelles and some Oak Leafs.

robin purple-magenta siggy

Read Full Post »

After we bought a Vitamix blender, we started making daily smoothies. The recipe book included contains a recipe for a tropical fruit smoothie and that’s the one I like. It uses oranges, bananas, pineapples, and spinach.

An issue I struggled with was the fruit and spinach going bad if I didn’t use it in time or especially when I had leftover spinach which was every time. I like spinach, but we don’t eat many salads around here and I was always throwing away yucky spinach. I don’t like wasting food or money.

So I decided to freeze it and that solved my problem. Except that it introduced a new one: I use zip top freezer bags and they’d get so much fruit juice on the outside from me wrangling the bags open with juicy fingers to get the fruit inside. The bags won’t stand up by themselves when they’re empty.

So we were at Sur la Table the other week and I saw these on the clearance table. They had enough (I need 3 or 4 for a batch of fruit) and they were cheap so I bought them. They work great!


IMG_3635 IMG_3636

The arms are adjustable and they hold the bags open.

Here’s a link to them on Amazon:

Baggy Rack

Here’s the recipe as I make it:

One batch yields about two 16-oz glasses (give or take depending on the size of the fruit), so I drink one and save the rest in a container for the next day. Since the pineapple yields about 4 generous slices, this gives me 4 batches and I use two per week. And if you are using fruit that you’ve frozen, it needs to be at least partially thawed or the blender will have a tough time.

4 navel oranges

1 fresh pineapple

4 ripe bananas

1 bag baby spinach

Agave syrup, light or dark (use your sweetener of choice)

1 cup water if the fruit has been frozen or 1 cup ice cubes if fresh

Peel the oranges and bananas. You can cut them up but I generally leave the orange whole and break the banana in half to fit inside the bag. Cut the top and bottom off the pineapple, cut into 4 generous (about 1 inch) slices and cut off the outside rind or whatever it’s called (or cut off the rind first and then into slices) and then cut each slice into quarters so that they’re easier to handle. Throw one orange, one banana, four pineapple quarters and a hearty handful of spinach into a bag to freeze for later or into the blender to drink now. If straight-to-blender, add one cup ice cubes. If you’re blending thawed fruit, add one cup cold water.  Once the fruit is in the blender, add the sweetener. I use 4 swirls of the agave syrup. Blend on high for a good 45 seconds. One nice thing about the Vitamix is the pusher can be used to push the fruit down toward the blades while it’s blending, especially helpful when the fruit is frozen.  (That whole orange can be pesky.)

I hope you’ll try this recipe whether you buy the Baggy Racks or not. A couple of my coworkers were making a smoothie that they called the green monster. I think it had kale in it rather than spinach. It looked awful to me but if you can get past the color, this one tastes great!


robin_siggy-rainbow


Read Full Post »

Gosh, I haven’t posted in a long, long time. I’ve been spending a lot of time with my genealogy software, updating family lines and fixing sources. I’m paying the price now for being lazy in my inputting in the past. And that’s way too boring to talk about on the blog.

So, what have I been up to otherwise? I decided to try to grow hydrangeas from cuttings. I’ve been researching the how-to of this online, finding that most articles and videos follow the same process but there isn’t just one I can point to that answered all my questions. So the procedure I followed is kind of a mashup of several of them.

Supplies

Most of the how-tos I found advocate using a plastic bag to enclose your cuttings once planted, but they never say what kind of bag. Ziploc? grocery? produce? dry cleaners? The point is to create a greenhouse-like environment and I just couldn’t envision how any plastic bag I could come up with would be successful. Plus, I have a very curious cat. So when I found a video on the This Old House website that showed using a plastic container instead, I knew that would be my solution.

You can see in the photo above that I have two plastic containers. The smaller one is the first one I bought, thinking it would be deep enough for cuttings planted in a layer of potting soil. But once I actually cut the stems, I found that it wasn’t deep enough. Plus, I had saved a plastic multi-pot thingy from some plants I bought from the local nursery last year for this purpose and it was too big for the box. So I bought the other one which seemed too big but actually worked out quite well.

You’ll need some soil. I found many different ideas about what to use so I bought some organic potting soil. I think any basic soil would work or you could make your own with peat moss and perlite.

You’ll need rooting hormone powder, a pencil and pruning shears.

You’ll need a mister.

Supplies

And don’t forget labeling sticks.

Supplies

Ok, let’s go take some cuttings.

Select branches that didn’t have a flower this year. Not a problem at my house because none of my hydrangeas bloomed.

You’ll want a cutting that has a pair of leaves at the top. I don’t know how important it is, if at all, if they’re mature leaves because you’ll be cutting them in half anyway, but that’s what I looked for. Then count down two more leaf pairs and cut just above the leaf pair after that.

Do:

Pruning-do

Do not:

Pruning-don't do

You don’t want to leave a stump on your stem. So here’s one cutting fresh off the shrub. Note that the topmost leaf pair is probably big enough that that I could have made the cutting shorter by one leaf node (in hind-sight).

Hydrangea cutting

In one of the how-to videos I found the lady just stripped off the lower leaves by hand but all the rest showed people using pruning shears or scissors. The leaf nodes are where the new roots are going to sprout from, hopefully. I didn’t cut the leaves off flush with the stem, I aimed for about a quarter inch from the stem. I don’t know how important this is.

Where to trim cutting

You’re going to want to make a horizontal cut of the topmost leaves. This just leaves more room in your container. You don’t need the whole leaf. You can see that some of my cuttings are longer than others.

Hydrangea cuttings after trimming

Next step not shown, is to fill your pots with the soil and poke a hole for the cutting with the pencil.

Now, dip your cutting in water

Dip cutting in water

and then in the rooting powder. Shake off the excess. (Every how-to I found said not to dip directly into the powder container as it could spread disease. With the exception of one video where the lady just defied current wisdom and did it anyway. Or maybe she didn’t know any better. To be on the safe side, put some in a separate container where it won’t blow away if you’re doing this outside and discard the leftover powder, don’t put it back in the original container.)

Dip cutting in rooting hormone powder

Poke the cutting into the hole you made with the pencil and tamp down the soil around it.

Cuttings in pot

Label the cuttings with the variety if you know it or at least the color of the flowers, if you know that. You could also put the date you planted if you think that’s necessary. I just marked the date on my calendar.

Cuttings in pot with labels

Here are my cuttings in the bottom of the container. Not shown here, I went to a friend’s house later in the day and took some cuttings from her plants (hey, I was on a roll) but I had to buy little plastic pots for those. They fit perfectly in this container with the others.

Cuttings in plastic container

Before you put the top on, mist the soil generously around each cutting. Here is the finished greenhouse in my sun room. It’s got great light and the cat can’t get into it. My plan was to mist the cuttings every day, but after a few days there was still condensation on the container, so I decided I’d wait and only mist once a week, unless it dried out sooner.

Finished "greenhouse"

In 6 weeks I’ll test for roots by gently tugging on the cutting. If there’s resistance, there are roots and I’ll cheer for success! I don’t expect every one of them to make it, which is why I took so many cuttings. Increases my odds.

After that, I’ll repot them in a larger container and move them outside. I have to come up with a strategy for that step because we have squirrels that would delight in digging them all up. I’m thinking I’ll either buy a cold frame or get my husband to make one for me. That should protect the baby hydrangeas and they may be big enough by next spring to plant in the ground.

But I’m getting ahead of myself. I still have that smaller plastic container and I may try looting my friend’s plants again (she has different varieties than I have) for shorter cuttings that only have one leaf node which would fit in the box better and I’ll see if the cuttings have to have two leaf nodes in the dirt to be successful or if one will suffice.

Watch this space for periodic updates!


robin valentine siggy


Read Full Post »

There were a number of things I would have liked to do in Cape May, like renting a bike and riding around town and hiking the nature trails by the lighthouse. Especially since Sunday’s weather turned out quite nice in contrast to Saturday’s. But part of my “plan” for the weekend included driving up to Allaire State Park and checking out Historic Allaire Village. A friend of mine talks a lot about dressing up in period clothes and joining the other re-enactors as a quilter. We have an historic village in our area, Henricus, and I thought Allaire might be similar and a nice photo op. And it would have been, except Allaire has a “no photography” policy inside the buildings. So I complied and restricted my photos to exterior shots.

IMG_2393

IMG_2394

IMG_2398

IMG_2400

IMG_2402

IMG_2404

IMG_2405

IMG_2406

IMG_2407

IMG_2408

IMG_2409

IMG_2411

IMG_2412

IMG_2413

IMG_2417

There was even a real wedding in the historic church. Apparently it’s a popular place for weddings.

IMG_2416

We decided when we left Cape May that we’d skip the Philadelphia portion of the trip because we wouldn’t get there in time to see the sights which closed at 5pm and I really didn’t have an after-5 plan. We didn’t want to spend another evening in a hotel without anything to do, although we would have been able to watch TV at the Courtyard 🙂

So we drove on home, with a stop for dinner once we got into Virginia. Next time, we’ll drive up on Friday so that we can get an early start on activities on Saturday. I’m thinking we can do this in the spring/early summer because I’ve been wanting to see Longwood Gardens (about an hour outside of Philly) and Winterthur in Delaware.


robin_siggy-water


Read Full Post »

We had a 3-day weekend and I didn’t want to let it go without getting away from home. We spend so many weekends doing laundry and running mundane errands that I just wanted to get out. There are a number of cities within a few hours drive that I would like to explore. I considered Pittsburgh, as we have friends from that area and they talk about it a lot. But, John didn’t see the point. Whatever that means. Apparently he didn’t want to go there 🙂

So I decided on Philadelphia. The last time we were there was a month after 9/11 and everything was locked down with armed guards (as I remember it), so we didn’t even stop. I also wanted to explore New Jersey (why does everyone diss Jersey?), so the plan was to spend a day in Philly doing touristy things and then head over to Cape May, which I’d heard so much about. I also wanted to see fall color, assuming NJ was far enough north to be further along in the color than down here.

Our weekend didn’t go exactly as I’d envisioned it. First, we had a Friday evening commitment, so we couldn’t hit the road then. That would have been ideal. Then, I couldn’t get an affordable hotel room in Philly until Sunday night, so we were forced to do the trip in reverse order. I couldn’t find a Marriott hotel (or any other chain for that matter) in Cape May and friends said oh just get a B&B. We’d never stayed at one before and I didn’t know how to choose, so we drove up without a reservation for that night. While on the road, I got ahold of the Availability Hotline, which gave me three B&Bs that had reported cancellations. Only one of them actually had a room, so I grabbed it.

Saturday was a rainy, dreary day and we didn’t get into Cape May until after 1pm, closer to 2, I think. We couldn’t check in until 3, so we walked down the street to the pedestrian shopping mall, looking for a light lunch. Even though we split a chicken salad sandwich, it was huge and was more than we intended to eat.

Here’s what we didn’t know about Cape May until we got there. Probably 95% or more of the hotels are Victorian B&Bs, I think. The town has historic status, so everything is protected and it tops the quaintness charts (if there is such a thing). If you go, bring rolls and rolls of quarters because all street parking is metered and one quarter will only get you 15 minutes. No Sunday exclusions, although I think you don’t have to feed the meters over night. There are ATMs everywhere and it was explained to us that a lot of businesses are cash only. We didn’t run into that and of course, you can’t get quarters from an ATM. So beware. Another curiosity was so many restaurants that advertised BYOB. Our host explained that there are a limited number of alcohol licenses, so they let you bring in your own. It’s a walking and biking town, so bring your sturdy shoes and your own bikes, although rentals are available. We were a couple of blocks from the beach and since it’s off-season, the beaches were pretty deserted. I can imagine what the town must be like during the summer.

IMG_2362

Andy and Toby were our hosts at Bayberry Inn. It is one of a few buildings that survived a devastating fire in 1878.

IMG_2348IMG_2301IMG_2349IMG_2351IMG_2333IMG_2350

A delightful place, I highly recommend it. One block from the Washington Street mall and two blocks from the beach. Easy walking.

IMG_2328

Saturday’s skies:

IMG_2317 IMG_2318

Sunday was much nicer:

IMG_2389

I would have taken pictures of every single fabulous B&B and inn if I could have. Here are just a few:

IMG_2315 IMG_2316 IMG_2325 IMG_2392

As I’d hoped, the town was decorated for fall and Halloween. Made me want to come home and plant mums.

IMG_2306 IMG_2307 IMG_2312 IMG_2313 IMG_2324 IMG_2329 IMG_2342 IMG_2343 IMG_2344

It just happened to be Lima Bean Festival weekend.

IMG_2353 IMG_2354 IMG_2357 IMG_2358 IMG_2359 IMG_2360 IMG_2361

Cape May is a big bird-watching destination because of the Atlantic Flyway. This is by the lighthouse and the place was teeming with bird-watchers. I overheard some people say they’d walked a nature trail and saw bald eagles.

IMG_2363IMG_2364 IMG_2367IMG_2369

Because of our late lunch, we weren’t hungry for dinner, although we did walk around about 8 o’clock looking at all the posted menus. We came back to our room, intending to watch an episode of Game of Thrones on the iPad, since there are no televisions at Bayberry Inn. However, it wouldn’t download and it wouldn’t stream, so we went to bed early 🙂

We left town Sunday morning to do some more touring around the state. I’ll tell you about that in Part 2.


robin purple-magenta siggy

Read Full Post »

Now that I have video capabilities in my new 70D, it’s going to turn into new opportunities for me to explore my artistic side, such as it is. I’ve taken a few short videos, but once you get them out of the camera, you usually have to tweak them before posting to Facebook, YouTube, etc. A lot of people put raw footage online, but I want to do more. I do not see myself ever going beyond the simplest of edits because I find video editing tedious and time consuming. I’ve been using iMovie, which is beginner/consumer level software, but I find it frustrating because I can’t remember how to use it from edit session to edit session because let’s face it, I don’t do this everyday.

But I saw this tutorial on using Photoshop for this purpose and wowee, I couldn’t wait to try it. We just got back from vacation and I brought back some short video clips I’d taken at our nephew’s wedding. I wanted to combine the 3 clips into one movie. Photoshop was awesome for this purpose. I played around with creating and adding an outro to my movie and I actually figured it out on my own. Woohoo! I don’t know if I did it the “right” way, but it worked.


That said, here’s my movie:

(The back story: this is my son Brian dancing with his cousins’ children, who love him to death, as you’ll soon see. They like to play Dance Party video games at family get-togethers, so they thought this was just more of the same.)


robin_siggy-comic book

Read Full Post »

I was playing around with a photographic technique of creating a black background even in the daytime. What you’ll need for this is a camera that will do full manual and a flash or speed light and a tripod (although this isn’t mandatory). If you have the equipment to take your flash off camera, you’ll have more flexibility. I have a light stand that I bought specifically for my flash, a gizmo with a cold shoe (I think that’s what it’s called) to mount the flash unit on the stand, and inexpensive remote flash triggers (Yongnuo brand).

Here’s the gist of how you do it:

Set your camera on manual. Set your shutter speed at the sync speed of your flash (check your user guide), I set mine at 250. Set your aperture for the highest number, at least 22. Set your ISO as low as it will go, 100 or lower. If using a tripod, turn off stabilization if your lens has that. Set your focus to manual and adjust that. Easiest way is to focus on your subject with auto and then turn it off.

Without the flash, take a test shot. You should get a solid black rectangle. This is your ambient light and in this experiment, you don’t want any.

Now, enable your flash. Fire away. Commence experimenting with different settings and positions for your flash. I have a Canon 580EX II and it offers ETTL (through the lens, rather automatic) and manual settings that let you dial down the strength by 1/3 stops, down to 1/32. I found that full strength was too harsh, anything lower than 1/4 was too low.  I set the light stand to camera left of my flower. I moved it all around, even took the flash off the stand and used it hand-held so I could get some overhead lighting.

IMG_3216

This is the best of my shots and it’s not great. I tried every position I could think of to get the shadows out of the flower and I must have missed the one position that would have accomplished this. And I do admit to cheating a little by adding some highlighting to the flower in Lightroom.

IMG_0821

I have a lot of work to do to perfect this. But it was fun playing around with it and using the gear. I recommend the Yongnuo flash triggers. I don’t know what the pricey Pocket Wizards do that the Yongnuo doesn’t, but these worked for me just fine. My only gripe is that when you attach the flash to the trigger, you have to remember to turn the trigger on first because the flash covers up the power switch. Same for turning it off.

By the way, this plant is a Streptocarpus, sounds like a disease or virus. I bought it last year when the Richmond African Violet Society held a plant sale at Lewis Ginter. I wasn’t familiar with this one and for the longest time, I was just trying to keep it alive. They were selling 2-piece plastic pots where you fill the bottom with water up to the line and then insert the part with the plant in it. I was so tickled when it bloomed, because it sure didn’t do much for the whole time since I bought it. They come in pink, blue and purple. Maybe I’ll get some more at the next plant sale.

robin purple-magenta siggy


Read Full Post »

Older Posts »